
A rather small, but what has become to me, a rather important little addition to my kit. A multitude of uses and as I soon found out, a source of fun. Something that’s been lacking of late in my endless days of client orientated work.
My Miops arrived from the UK Distributor, UK Highland Photography (www.ukhp.co ), and it was quickly unboxed. Hmmmm.
The trigger, and a couple of (short) cables.
OK, a quick online search and the full PDF is available online for download here.
Another five minutes reading, and it all seemed very straight forward. Surely this would be a little more difficult than it first appears, particularly as we’ve done a great deal of high speed photography in the past for clients and we’re fully aware of the time and preparation involved with such shoots.
So with this in mind, we organised a number of shoots. The functions of particular interest to my team and I is the laser, sound and HDR and we will cover these in some depth.
One of the Miops features quite heavily touted is the accompanying App, allowing the Miops to be controlled remotely via a smartphone. The app is freely available from both Google Play and the Apple App Store. The only requirement for your smartphone is the fact it needs to be compatible with Bluetooth 4.0 to communicate with the Miops and the operating system should be either iOS 7.0 or higher, or Android 4.3 or higher.
The Miops is fully functional without the app. In fact for the purpose of this review, we used the Miops without the app specifically to see how usable/easy it would be to obtain the imagery we were after. We found we managed perfectly well without the app. However, the app certainly makes life easier, and I would definitely recommend using it for the modes we have used when reviewing.
In Laser mode, starting or stopping the Miops can easily nudge the trigger by a millimetre or so, which is enough to misalign the laser beam and therefore affect the accuracy of the trigger event. In sound mode, particularly the way we had it set up, it would have been far easier to have stopped the triggering by using the app, rather than fumbling with wet fingers on a rubber button. Whilst not using the app had no impact on the HDR function, using the app was actually quicker and easier due to the larger display and ease of adjustment.
Having used the Miops manually a number of times in various circumstances, I would have to say the app is a nice addition and the way I would now prefer to interact with the Miops. That said, if my phone died whilst on a location shoot, it would have little or no impact on my use of the Miops.
There are a few modes that are app only initiated. Scenario mode can be executed from the Miops interface, although it requires the app to set it up. Cable Release, Press & Hold, Press & Release and Timed Release are all app only features.

HDR options screen
Between you and me, I did have a minor hiccough when first trying to use the app. Basically, it wouldn’t connect to the Miops and would just say Demo instead of the Miops unit ID. After a bit of hair pulling, I uninstalled the app, reinstalled it and then re-booted the phone. Drama over and no problems since. The likelihood is that it was my phone and the apps I had running, rather than the Miops app itself. (However, I no longer need to worry about combing my hair!)
The Miops has a photocel on the front panel, which is utilised for a number of things, including the laser triggering function.
The available parameters are straightforward, and are pretty much self explanatory.
There are three parameters available:
-
Threshold – This is the sensitivity to the laser. If set too high, it can cause false triggering. Too low a setting can cause failure to trigger.
-
Delay – Allows you to delay the shutter release after the initial trigger event. Delays are specified in milliseconds (0-999)
-
Frames – How many images you want taken once the laser has been interrupted.
Once your preferences are set, a press of the start key and you’re good to go.

We decided our food photography signature image (shown above) could do with an overhaul. It features a strawberry creating a splash as it’s dropped into a spoon of cream.
Sounds simple, but the last time we did this, it took pretty much a full day, several punnets of strawberries, a couple of tubs of cream and three team members.
The original was shot “manually”, meaning it was shot at 11 frames a second, and there was a fair bit of cleaning up going on between attempts. Main drawbacks with the original attempt was the cost. Three team members for most of a day, more strawberries than can be found in a corner store. Pretty much the same with the cream too for that matter.
So what was the problem?
Basically, an inability to be accurate with the strawberry dropping, coupled with timing of the shutter release. You may well think that shooting at 11 frames a second would pretty much increase our chances of nailing a good shoot in quite a short time frame. Well, not quite. There were too many variables involved. If the shot managed to coincide with the strawberry hitting the spoon, then invariably, the strawberry hit off centre, and believe me, it didn’t have to be far off centre for it to effect how a good a splash we captured. Most strawberries could only be used a couple of times before they were too damaged and needed replacing. The original image was actually a composite of several images to get the right strawberry position, along with a nice looking splash. I think it was a composition of four or five images in the end.
So, coming back to the Miops. I have to say, I was a little apprehensive considering the time involved with the previous image, and I didn’t particularly relish the idea of giving up another day, and all associated costs, just to recreate a perfectly acceptable image. Anyway, needs must and all that.
I carefully read through the online manual, and eventually contacted UK Highland Photography to clarify if there was a dedicated laser unit for the Miops. Apparently not. Any laser pointer will do. It just needs to be aimed at the photo cell on the front of the unit, and when the beam is broken, the shutter is fired. Simple!
Now, I already had a laser pointer I use when delivering talks regarding lighting, but it has a push button activation which can’t be locked “on”. A pointer that has the ability to be locked in the “on” position would be easier, but non the less, we had a laser and I’m too tight to go out and buy another!
The laser was simply attached to a light stand with a clamp, which was tightened over the button to keep it activated. It was positioned about 35 feet from the sensor, as it needed to be quite far back to travel across the top of the spoon and hit the Miops sensor, which was immediately alongside the camera. The Miops couldn’t be placed in the camera hotshoe, as the radio trigger needed to be there to fire the lights. Sounds simple, but we did faff about a bit positioning the laser pointer, mainly because the angle needed to cross the spoon almost straight on to the camera, but not to the point where the laser pointer may intrude in the frame.
All in all, it probably took an hour to set up, with a couple of dry runs to assess accuracy. It also highlighted an interesting issue. I say issue, but it was an operator issue, not an equipment issue. The laser triggering is so accurate, that should the strawberry fall ever so slightly off centre, then the laser would be interrupted slightly later, or possibly missed by the initial impact, but triggered on the bounce. At first, we thought we were getting issues from incorrect delay settings, but when they were adjusted, we then got inconsistent results, and that’s when we realised it wasn’t the laser, or the Miops. It was us.
We clamped a small stick over the spoon as a point of alignment, and holding the strawberry at the base of the stick increased the incidence of laser break to trigger the camera. Now that we were getting a much higher “hit” rate, we added the cream, which unveiled a new challenge. The strawberry didn’t have the mass to displace the cream as well as we would like.
Solution? Skewer the strawberry with a very fine screwdriver and hit the spoon filled with cream. We got the shot we were after first time, and removing the screwdriver in post was a two minute task.
It took an hour to set up, but once we worked through the challenges and had what I would describe as the best possible solution, it took just minutes to get the image, and I guarantee we can duplicate the whole thing from scratch in less than thirty minutes with one operator. The cost savings on this one shot would actually pay for the Miops compared to the cost of the original shot.
The final image is below:

One thing that came to light is the fact that should you wish to suspend the laser mode, or even when starting the laser mode, pushing the start button on the Miops may cause sufficient movement of the Miops trigger to cause misalignment of the laser, and effect the triggering accuracy.
Once the alignment has been made, I would suggest using the dedicated mobile app to set or amend your settings and initiate the laser mode, as this leaves the trigger untouched and less likely to cause alignment/triggering issues.
The sound function allows triggering of either the flash or the camera, or both. We used the miops to trigger the camera, although I am aware that we were introducing a small delay (around 300 milliseconds) into the equation. That’s fine for what we had in mind. If, on the other hand it was something like a lighbulb being shattered, then we may have chosen to go down the route of having the camera in bulb mode (no pun intended!) in a dark environment and triggering the flash, which is the method outlined in the Miops manual.
Very easy to set up. Simply point the Miops at the sound source and adjust the parameters.
There are three parameters available:
-
Sensitivity – This is the sensitivity to the sound. Setting too high can cause false triggering. Too low can cause failure to trigger. Having the trigger further away from the source introduces a delay (3 milliseconds per meter) and will need to be compensated for with higher sensitivity.
-
Delay – Allows you to delay the shutter release or flash after the initial trigger event. Delays are specified in milliseconds (0-999)
-
Lock – If set, the Miops will trigger once. Particularly useful if using the dark environment and firing the flash mentioned above. In this case, multiple firing can ruin a high speed image.
I’d just like to say, this was possibly the most fun I have had in a very, very long time. To torture one’s colleagues, assistants and friends in the name of research, I’d buy the Miops just for this!
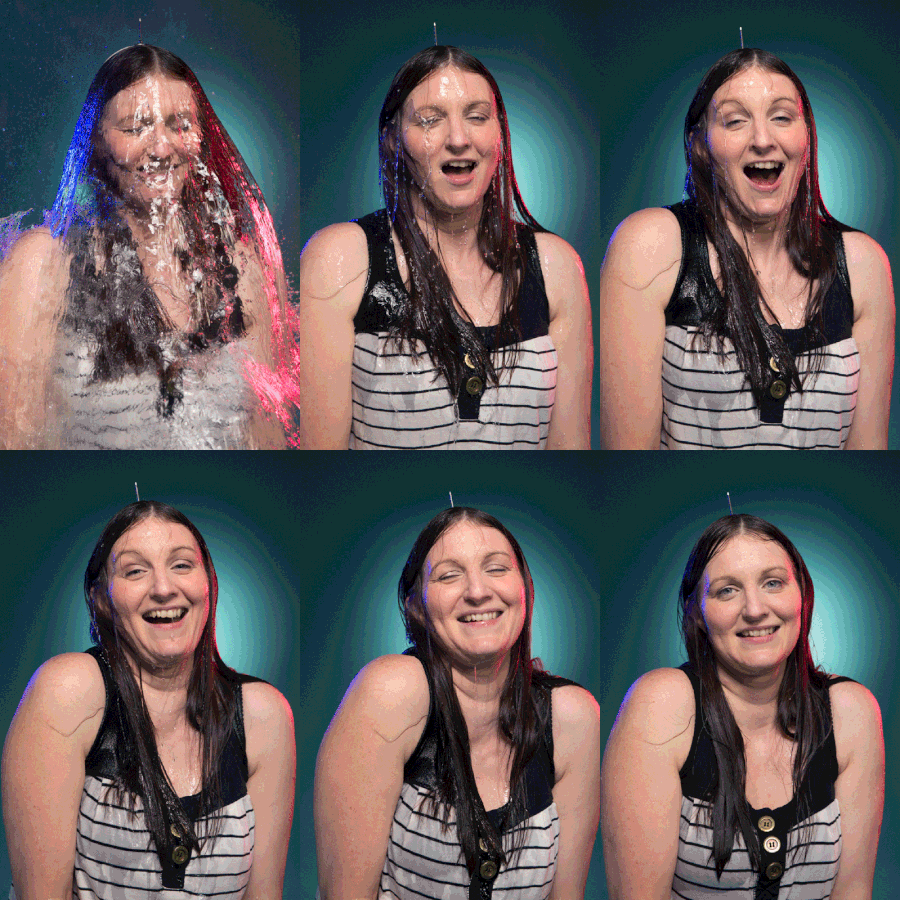
The guy in the first image is Wayne Myers, one of my photographers and closest friends. It was his idea to use water-filled balloons and gel’d lights to demonstrate the sound triggering function of the Miops. The other guy is just some dude we found the following day. Ok, I lied. It’s Martin “the beard” Wilson, another photographer friend we conned into sitting in a children’s paddling pool in the pursuit of research. (Yes, I know we already had the image we needed for the review with Wayne, but the opportunity to torture others was just far too great!)
The method we employed to obtain these images is not the same as that outlined within the Miops manual. Miops suggests using a dark room and having the camera make a longish exposure, say a couple of seconds. The sound event then triggers the flash, rather than the camera. The short duration of the flash “freezes” the motion. With the Miops suggested method, it’s important the Lock parameter is used, so as the flash is fired once only. Otherwise, you will obtain an image with multiple exposures and the water motion will be blurred.
The Miops suggested method works extremely well, as proven by countless others. For some of our own client shoots, this would be the route we would also take. However, for the purpose of this review, and also to allow me to humiliate my victims further, we wanted to be able to capture a full sequence of images. This meant the Miops was used to fire the camera, rather than the flash. We chose to use the Nikon D4, as it has a frame capture rate of 11fps. Whilst the Miops sends a single fire signal per trigger event, in this mode it’s per sound. The popping of the balloon and subsequent spatter of water causes the Miops to pretty much continually fire. The hardest part was stopping the sequence once done, as the dripping water and gasps from the subject would potentiate the firing.
An advantage to using the camera firing method as opposed to the flash firing method is the fact the images can be captured in a fully lit studio. This means we could see exactly what was happening at the point of capture, allowing me to revel in the discomfort of others.
Shopping List:
-
1 x Children’s paddling pool (large!) with walls of a decent height.
-
1 x pump to blow said pool up without hospitalising the assistant.
-
Water balloons (twice as many as you initially think you need!)
The paddling pool was blown up and placed centrally in the largest studio, along with a suitable seat in the middle. The camera was placed on a tripod as close as possible to one end of the pool, and a set of step ladders was placed alongside.
Two rim lights were set up at the far corners of the pool, and set to fire through gridded 40cm beauty dishes. The left light was gel’d blue, and the right light was gel’d straw and cerise (making a kinda red, because we seem to have mis-laid our red gel for some reason). Both were around five feet high and angled down towards the heads of the victims.
The backdrop light was placed on a floor stand at about two feet off the ground. It was firing through a standard reflector with a grid fitted.
The main light was above the camera and angled down towards our model. It was firing through a gridded 70cm beauty dish.
The lights are fired by a transmitter on the camera, not the Miops. The Miops was fitted to a plastic cold shoe, which was mounted on a clamp. The clamp was affixed to a reflector holder arm so the Miops could be placed fairly near the subject. We set the sound level fairly high and a delay of 0.
We had a fairly thin Alice Hair Band which Wayne duly modified to take a tack on top, and this was worn to aid the bursting of the balloon.
We did find that occasionally the Miops would trigger prematurely as the balloon left the hand. This was caused by the rubber “snap”, and was easily rectified by holding the balloon in the palm of the hand and allowing it to roll off, rather than suspending it by the knot and letting go.
It took several attempts to get what I would term the perfect “pop”, but it was an awful lot of fun, and I wouldn’t mind doing it again.
Having more air within the balloon created a louder pop, but sometimes having no air in at all didn’t make a difference. We also tried without the Alice Band, resting the balloon on their head and then popping it. The item used to pop the balloon was easily taken out in post if visible.
I wouldn’t attempt this without the Miops, as the chances of obtaining a usable image would actually be down to luck.
Very, very easy to set up, but it does take perseverance and patience (and very understanding friends!) to get the image you really want.

Addendum :
Water has an amazing ability to travel further than anticipated. Plastic sheeting around the pool is a good idea. As is wearing clothing that is suitable for getting wet, and also having a change of clothes available.
Note to self : A suit does not comply with above!
Incidentally, remember I mentioned I wanted to capture the full sequence of images? The following is a byproduct, allowing us all to revel in their discomfort. Again and again!


Miops allows you to capture images of lightning or fireworks etc, by triggering the camera when there is a sudden change in the level of light.
The camera is best to be manually focused, the aperture set and the appropriate shutter speed for the correct exposure to be determined .
There is just one parameter available:
-
Sensitivity – This is the sensitivity of the photocell required to trigger the camera.
The sensitivity will allow you to choose whether you capture the largest lightning bolts only, or whether you might want to capture even the smallest of lightning bolts. A high sensitivity value will trigger the camera for the smaller bolts, but you will also be susceptible to false triggering. A lower value will restrict your captures to the brighter, larger bolts of lightning.
Now, because we live in the UK, we don’t have that many thunderstorms, apart from the day the trigger arrived and was left at the studio, and I was woken in the early hours by a thunderstorm.
I didn’t get to try this feature in time for the review, but the setting is a doddle and I don’t foresee any problems.
I did play in the studio, initiating a trigger event by firing a strobe. It worked fine, but it’s not a real world test.
Miops allows you to setup, and then shoot a series of bracketed images. Whilst my own cameras have this ability, I realise some cameras do not, or to a limited extent and therefore the Miops allows bracketing on any supported camera.
The camera is required to be manually focused, the aperture set and the appropriate shutter speed for the correct exposure to be determined and set within the Miops menu. The camera’s shutter speed is set to Bulb as the exposure adjustments and firing is managed by the Miops.
There are three parameters available:
-
Center – This is the shutter speed that would give a good standard exposure for the given aperture and ISO set within the camera. This is your base value.
-
EV(+-) – This is the Exposure Value step between each exposure.
-
Frame – The number of images to be taken. Usually an odd number, as you have the center exposure and a balanced under and over exposed frames.
When creating HDR images, I don’t mean those frightfully electric, highly halo’d strange and other worldly type images that have become the signature HDR image everyone thinks about as soon as the term HDR is mentioned. No. I mean images that have a great deal more detail in both the shadows and highlights than can normally be captured within a single frame from a camera. Much nearer to what we are able to see naturally.
The Miops’ HDR mode allows you to shoot a maximum of 7 different images, with a quarter to one stop variation between each image. These images are then imported into the HDR software of your choice. The following groups of images show the final blended image, followed by the five captured images that that created the final image.
To be honest, this is extremely easy to set up and manage. Although the one thing to remember is to shoot with the camera set to Bulb mode, otherwise you end up with all frames with the same exposure value, as Wayne, one of my photographers found out. I find the correct exposure as indicated by the camera’s lightmeter, and that gives me the shutter speed I would enter into the Miops. The ISO and aperture values are set on the camera, and the shutter speed is set to bulb (take note, Wayne).
Once the camera is set, I then enter the required values into the Miops, which includes my “metered” exposure value, which is entered in the “Center” parameter. I then choose the exposure value I want between each frame. I tend to use a value of 1, although the Miops does offer more options than most cameras, as you can choose 1/4, 1/3, 1/2 or 1/1 values. Finally, I chose the number of required frames, which tends to be five, as it was with the images shown here. And that’s it as far as the settings go. Pressing the start button initiates the sequence, and a timeline allows you to see the progress as the images are captured.
You are then left with your required number of images, and then it’s up to you as to how you process them, and with what software.
The methods available for blending the images are varied, and the range of available software, whether stand alone or a plugin for the likes of Adobe Photoshop, is very comprehensive, and far beyond the remit of this review.
A free option would be to have a look at the Google Nik Collection, which became freely available early 2016 and includes HDR Efex Pro. Adobe Lightroom also has a HDR blending function.
Generally speaking, I tend to shoot either three or five frames, unless the scene is particularly challenging. I have to say, this particular mode is extremely easy to set up and very easy to operate. The results are exactly as I would expect. Basically, it does what it says on the tin.
Miops allows you to setup, and then shoot a series of images at a set interval. These images are then usually compiled into a video using appropriate software.
The camera is required to be manually focused, the aperture set and the appropriate shutter speed for the correct exposure to be determined and set. The shutterspeed can be set by the Miops, if the camera is set to Bulb mode.
There are three parameters available:
-
Interval – This is the time between each exposure and can be set at intervals from 1 sec up to 1 hour. This setting is made at 1 second increments.
-
Exposure – This is the Exposure Value which can be anything between 1 sec and 1 hour. This value is utilised by the Miops if the camera is set to Bulb mode for the shutter release. If not, then the exposure value is whatever has been set on the camera.
-
Limit – The number of images to be taken. Anything from 1 frame, which is rather pointless for a timelapse, up to 9999.
I used Serif Movie Plus to compile the collected images into a video, which was painless, and the setup of the Miops Smart is extremely simple. Set the three parameters and start the process. I would suggest setting the focus and then switching to manual focus to stop any errant focal changes etc.
The DIY mode allows the Miops to trigger a camera by methods such as temperature, vibration or anything else you can think of. The catch is in the name. This mode is aimed squarely at those who have the skills to create the sensor that will trigger the event with the Miops, and therefore trigger the camera.
The jackplug requirements are outlined quite clearly in the manual, with the specs such as triggering voltage used, and which part of the jack is ground, trigger and Power. Whilst plainly aimed at those labelled as “expert”, I find myself starting to ponder the possibilities.
The scenario mode is only executed by the Miops. This mode is set using the app.
The scenario mode is the most powerful feature of the Miops, as you can configure up to five different steps which can be any of the basic modes, and each step is fully configurable.
Due to time restrictions, I was unable to make use of this function, but I can certainly see a use within the studio where we could utilise laser and sound scenarios. I’ll certainly be setting a little time aside to have a bit of a play at some point.
At the point of opening the box, I was intrigued. A few of the functions caught my attention and since using the Miops, it’s now a permanent addition to my bag. I certainly have no qualm about the unit rattling around my case. It’s solidly built and well engineered
The basic modes are easy to setup, and I’ve already proven to myself it’s worth with the highspeed photography, which we have frequently done before. The difference with the Miops is the fact we can replicate anything we’ve done with relative ease. More to the point, it’s far quicker to set up and far more accurate with the image capture. As I’ve previously said, recreating the strawberry splash basically paid for the Miops, and then some.
The use of the app turned out to be equally easy, and improved the ease of use of the Miops, if that makes sense. Using the app also increased the accuracy of the laser mode simply by reducing the chance of movement when initiating or stopping the trigger.
As a commercial photographer, the cost of the unit is recoverable with the first client shoot, purely from a time saving perspective. The test and images were done in conjunction with a Nikon D4, because that is the camera cable I have. The range of cameras supported by the manufacturers is extensive, and a full list is available on their site (www.miops.com )
The UK distributor is UK Highland Photography ( www.ukhp.co )

















Awesome writeup
[…] If you are interested in the Miops triggering device, I purchased it from UK Highland Photography, and I’ve previously reviewed it here […]
I have just acquired a MIOPS which I will be testing. Your detailed descriptions are very helpful! I have to wonder not having tried it yet if the sound of a water balloon popping is sufficient to trigger the unit? Obviously, it worked for you. How close did the MIOPS need to be to the subject and what sensitivity settings did you use?
I have been doing this kind of photography with no trigger, just luck and repeated tries, so I’m anxious to see what I can do with a trigger. Thanks… Rick Ohnsman — > https://improvephotography.com/49616/a-beginners-guide-to-high-speed-photography/.
Hi Rick.
You really don’t need to be that close. You will also find the Miops can be extremely sensitive. The first time I used it, I had it turned up far too high, and simply taking a very light step towards the balloon set off the shot.
Meh!
[…] utilises your mobile as a wireless, feature rich remote release. There is some overlap with the Miops Smart, such as the HDR mode and timelapse mode, but with a slightly different approach. The unit is […]
[…] time ago, I wrote a review on various Miops triggering devices. My first was the Miops Smart trigger, which revolutionised a lot of the creative product shots I […]